 |
| Home |
Solex 4a1 carburetor re-build
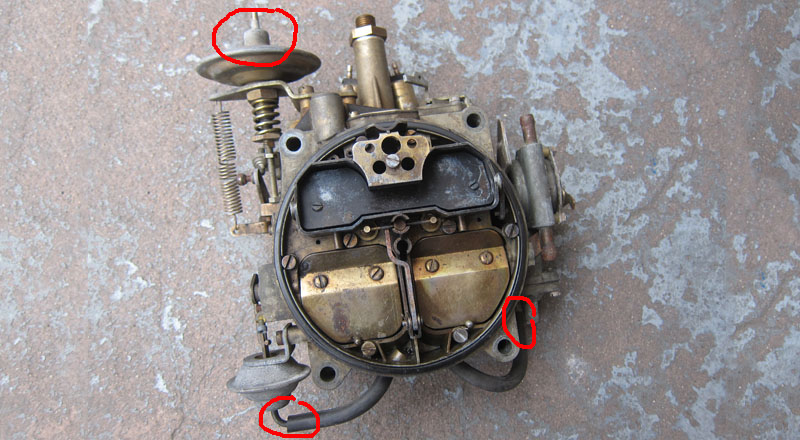
Before taking your Solex 4a1 carburetor apart, evaluate your "patient" and prepare yourself understanding that a re-build is not as simple as swapping some gaskets. Your 40+ year old carburetor will most likely have a number of issues that need to be solved before you can call your re-build a success. You should check all the exterior components to see if you need to source those from some place as it isn't uncommon that at least one of those failed. Using an inexpensive vacuum pump see if the air dampener, throttle lift, and the choke pull off holds vacuum (pic below). If your air dampener isn't holding vacuum, your secondaries air flaps will open way too easily extremely leaning out the mixture creating a very erratic driving experience (you might be able to source one from a place that provides spares for Quadrajet carbs). The only way out of this dilemma, short of getting replacement part, is to wire the secondaries shut (in essence disabling your high RPM power potential) - then you might as well just swap your carb for a Weber. If your throttle lift doesn't hold vacuum - the constantly extended spring will significantly increase your idle. If the can isn't working, just screw in the screw so that it won't have any effect on your idle. This will decrease your driving pleasure as the purpose behind the throttle lift is to increase idle throttle when the engine is low on vacuum due to increased demands such as when your AC is on. If your choke pull off doesn't hold vacuum (it's OK as the rubber diaphragm on all but very earliest models come in the rebuild kit), when the engine starts the diaphragm will not slightly open the choke, flooding the engine.
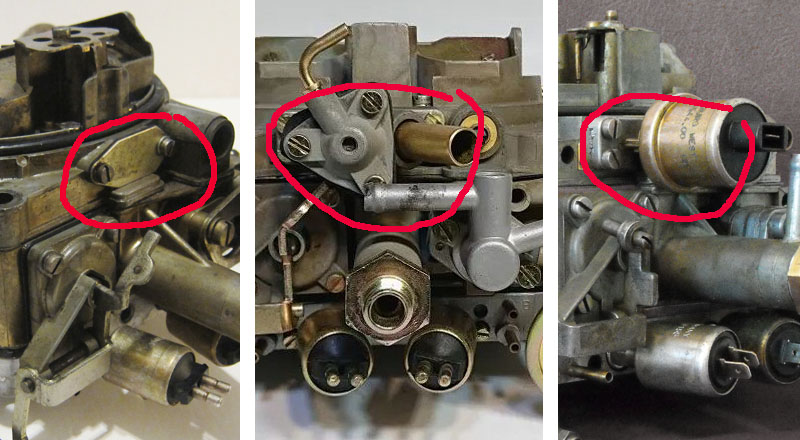
When you have the pump out, also check the can in the fuel pressure regulator (not pictured here but it's the can right before the fuel inlet). If it isn't holding vacuum, the fuel might be pulled through ripped diaphragm into the intake manifold greatly enriching the mixture. This part is not easy to find, but if yours isn't working, with some ingenuity, you should be able to use a replacement from another manufacturer. Also test the fuel vent, if your carb has one (not present here, but see the options in the picture below). It needs to operate when vacuum (or electrical current, depending on version) is applied otherwise your fuel consumption and drivability will suffer. The diaphragm doesn't come with the re-build kit.
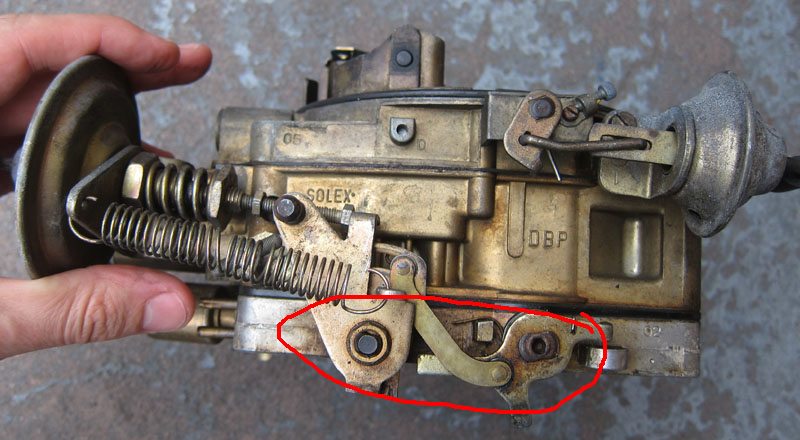
If all those components check out, move on to the shafts of the air horn. See if the choke plate opens freely (you might want to disconnect the cam holding it down), likewise see if secondaries air flaps open and close without binding. They are held up by spring tension so most likely it will spring back up when you press it. If the spring is broken (some kits come the replacement, but most don't), the flaps will just hang down but they should still move freely without binding. When the air horn is tightened too far, those shafts bind against distorted housing and then you must ram out the shaft holes for smooth operation (I don't cover this part, because it happens relatively infrequently). Your throttle shafts almost certainly might need new bushings. Turn the carb on its back and see how much play you get in the throttle plates. Side-to-side play is OK but any up-down or back-forth, indicating that the holes holding the shaft are not round anymore, is not. This will cause vacuum leaks and the imprecise throttle openings often delivering a different fuel mixture to one side of the engine versus another. One of the tell-tell signs is the discoloration around the throttle shafts indicating fuel sipping out (pic two below). If there is any play, you most likely will have to re-bush your plate. Mechanical parts wear out - this is just part of the game. Primary shaft is 8mm (use 5/16 reamer for bushing then just rim it down to 8mm) while secondary is 10mm (use 7/16 reamer for bushing then just rim it down to 8mm). (read more about re-bushing)
You also have to ask yourself what you will do about the TN choke as it might be stuck open or closed upsetting the fuel/air mixture. The very early Solex carbs (such as this one in pictures) didn't have that device so if yours isn't working, just find a way to disable it remembering that in open position it will crate a vacuum leak. Understand that over the years there were many variations of the basic Solex 4a1 carburetor - all with small modifications to the carb's body components. You can identify some changes by looking at the fuel bowl vent (from none, to vacuum operated and ending up with electrical - see one of the pics above), presence of TN choke and the sort of choke pull off. The manual for the carb is 180 pages, so don't automatically expect that the pieces are interchangeable. That said, the chokes, air dampener and throttle lift cans change from one carb to another easily so getting a spare used carbs with those components working will greatly help in your rebuild. Now that you know what to expect and still decided to go DIT route, get ready to take your carb apart. Needless to say, take lots of pictures to help you with reassembly.
Disassemble steps: 2. Remove the pin holding the choke and force the choke cam off the linkage. Remove the screw holding the choke housing and set it aside along with the cam holding secondaries shut and the choke level.
3. Remove another pin holding the secondaries cam and rods and pull the enrichment device out.
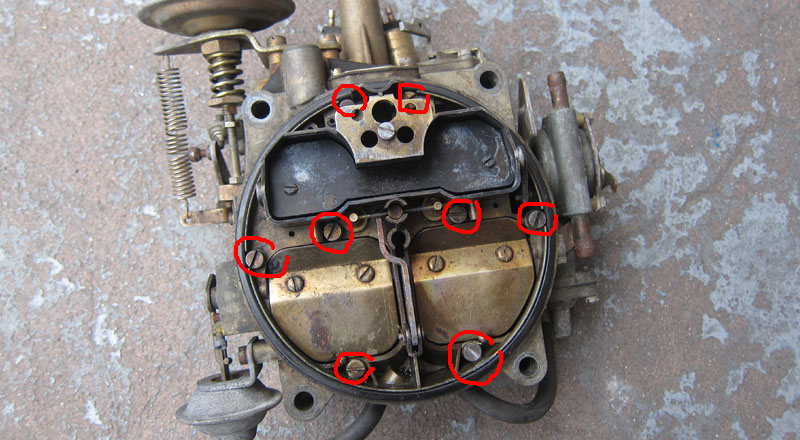
4. Remove the top screws (8 in total) and pry top air horn off the body. Both parts will most likely be stuck so use some force but also be gentle!
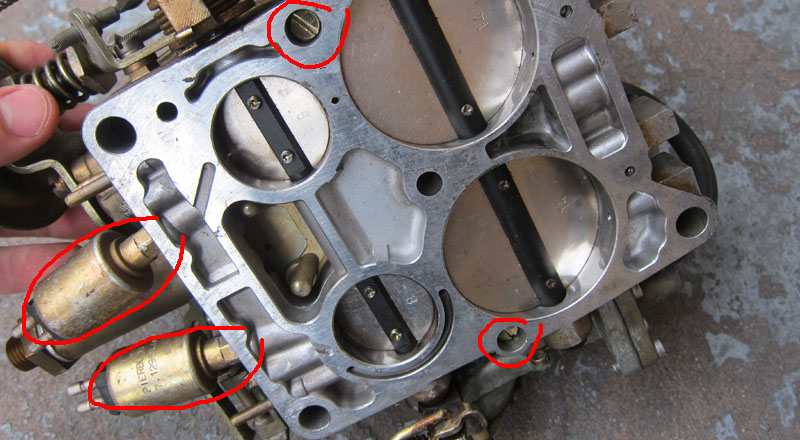
5. Remove the bottom screws (2) and separate body from bottom plate twisting it around from the accelerator pump linkage. Unscrew the idle mixture screws and the fuel shut off valves. Applying 12v current see if their tops open and close (you will also hear a click). They barely ever fail but if yours do, you might want to simply block off the openings with some short screws (short enough so they don' block the passage) as the shut off valves are not crucial for carb's operation.
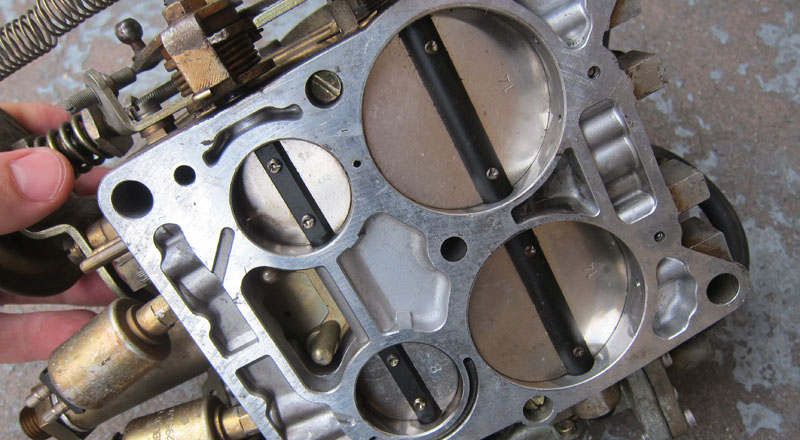
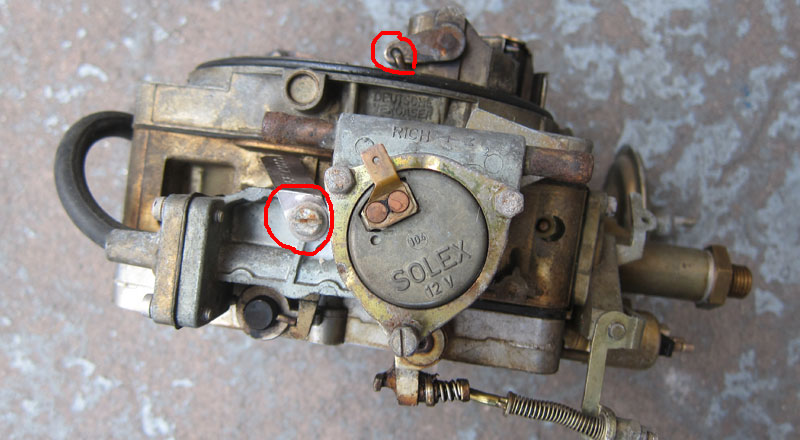
6. There are a number of screws that should never be touched because those were set at the factory but, of course, many were molested by "mechanics" over the years. The air bypass screws at the carb's base (bless you if yours are still plugged as in the pic below) control how much extra air is pulled in by the engine on carb's each side. If your were adjusted, you need to balance the air flow on both sides. You can do so by constructing a crude vacuum measuring instrument as outlined here.
7. Unscrew the remaining accessories from the carb's body: accelerator pump, fuel vent (or the plate as is the case here), throttle lift and the fuel filter.
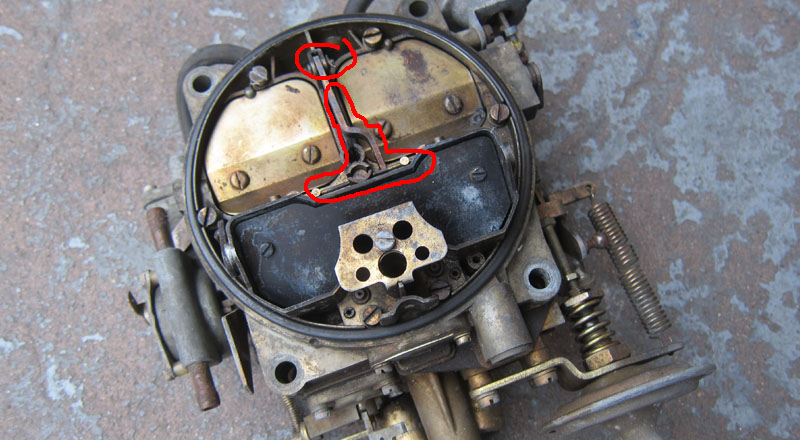
8. Open the choke housing by unscrewing the 3 screws on the side and 4 screws on the back removing the rubber diaphragm. Also remove the acceleration pump from the carb's front. 9. Using a metal edge check which parts of your carb are warped. Those carbs are prone to heat induced warping. Let me rephrase - they all are warped to some extends (four Solex 4a1 carbs I have all exhibit this issue). The warping introduce vacuum leaks causing very rough idle as fuel is pulled through two gaskets (see the pic below) so if any of those passages isn't tight and there is a vacuum leak, the air instead of fuel is pulled into the engine upsetting your perfect mixture balance.
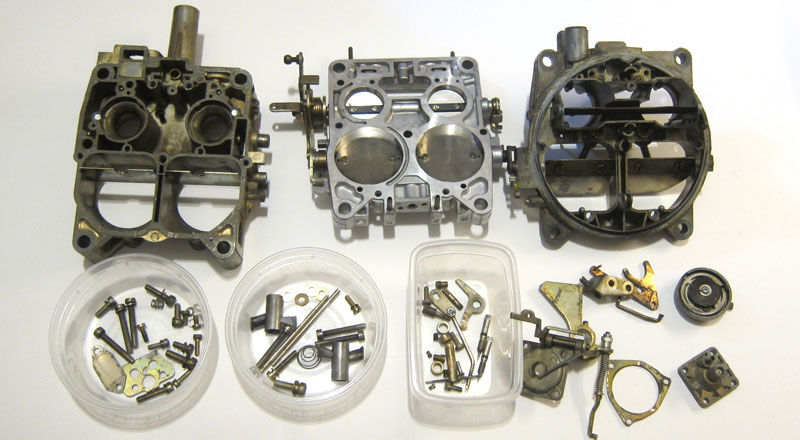
What to do if your carb is warped? Well, first see how bad it is by placing a straight edge to the bottom of top air horn in a number of areas. Estimate the largest gap. The thickest gasket material you can buy is 1/16in (around 2mm), so if the gap is larger - you are out of luck as far as this write up is concerned. However if the gap you find is small, read on. Also understand that the typical gasket thickness from a rebuild kit is only 1/32 (around 1mm) so almost certainly you will have to create your own gasket out of thicker material. You might get away with gluing two gaskets together to create one thicker one but as you know you technically shouldn't do that as it might induce leaks. The idea here is to slowly keep on tightening the air horn to the fuel bowl section compressing your thick gasket until all gaps are filled. Bottom plate is most likely straight as if the bottom side of the body section. The body and air horn is most likely warped. To compensate, you might need to cut out a thicker gaskets (read about it here). 10. You should now have your carb in 3 main pieces and a bunch of smaller elements. Clean all the passages with a healthy dose of carb cleaner (wear eye protection!!!), old toothbrush and soft cooper wire to unclog all passages, then blow it out with compressed air. For caked over carbon/oil deposit you can use Sea Foam. At this time you can confirm your jets if they are correct for your carb and year. 11. Confirm that your primary boosters are tight and if not re-stake those (mine were loose). 12. Using vacuume pump, check that the fuel bowl needle and seat is holding vacuum. Time to screw the carb back together. You should have your bottom plate re-bushed (read here), your new thicker gaskets cut out (read here), and your malfunctioning parts replaced. You should also have your re-build kit on hand.
Re-assemble steps (pics are coming soon): 1. Replace rubber choke pull off in the choke housing. You might have to sandpaper (user very smooth grit) the surfaces for more exact fit especially because over the years even aluminum rusts so the edges might not be smooth anymore introducing a vacuum leak. 2. Replace rubber washers on the idle screws and the shut-off valves. 3. Replace rubber for accelerator pump. 4. Replace the metal ring for the fuel inlet after inspecting that the filter is clean. 5. Replace the fuel bowl plate/vent gasket. 6. Replace the fuel needle and reassemble the float with pin and spring. This is a good time to set the float height (see basic Solex carb set-up). 7. Re-attach the choke with cam and the lock cam. 8. Grease up the bottom gasket and assemble bottom and middle part with the 2 screws. Grease helps the gaskets not to stick to the surfaces. 9. Grease up the top gasket and assemble middle section with the air horn. Make sure to insert the choke cam carefully into the top section. Screw in the 8 screws. 10. Attach the secondaries rod and lifter cam. 11. Attach whatever else there might be.
|
| copyright 2019 by Patryk Rebisz |