 |
| Home |
Solex 4a1 - how to deal with warping
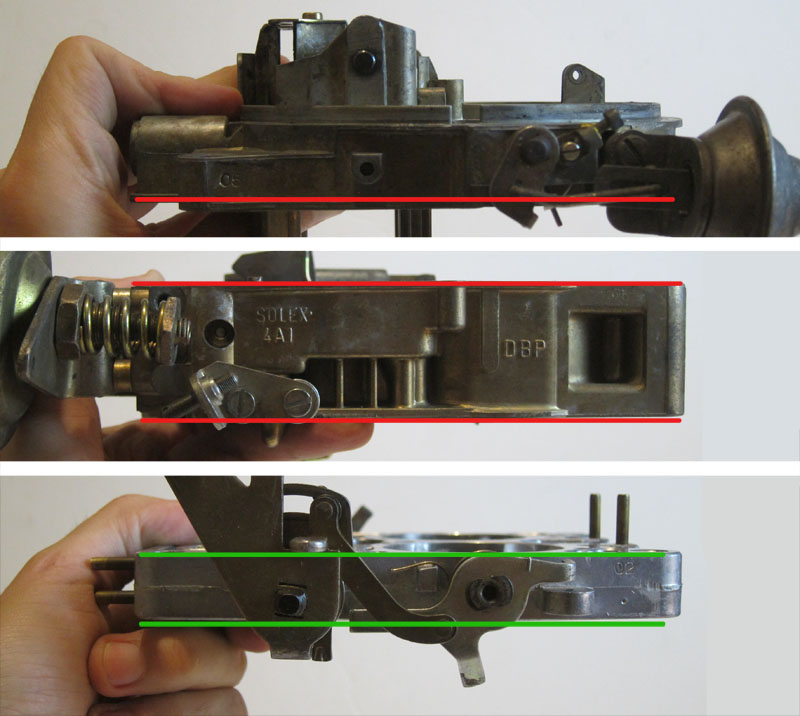
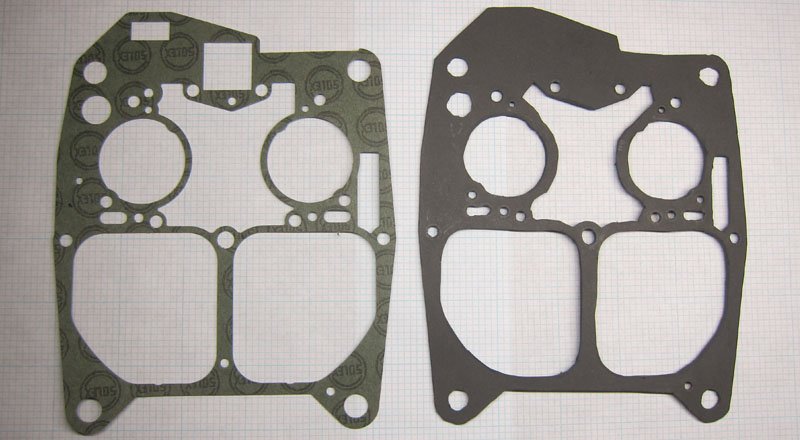
Solex 4a1 carburetor warps. Period. There is no way to avoid it. What differs between each particular carburetor is the amount of that bend. If you take a straight edge to each of carb's 3 parts, you will find that the top and bottom edge of the base plate remains consistently flat (green lines in pic above). It's the other two parts - the middle section and the air horn - that warp (red lines). The cause of that warpage is over tightening of the carb corner mounting lugs AND over tightening of the nut holding the air cleaner. The first action compresses the edges down, while the second pulls middle section of both mid and air horn up. The flat surfaces loose their air tightness and vacuum leaks develop resulting in a poor idle and driveability. This problem isn't helped by the fact that the gaskets in the rebuild kits are very thin (1/32in or 0.7mm), as if they were meant to simply replace old gaskets in a NEW carb. In reality, you can deal with the warpage by incorporating a thicker gasket that unfortunately you will have to cut out yourself from a thicker material. I use 1.6mm (or 1/16) Fel-Pro 3187 gasket material to merge air horn to mid section, and Fel-Pro 1/32 (0.7mm) as top layer for the plastic spacer between base plate and mid section. The top gasket (pic below) between air horn and mid section is intricate, so it helps to know what the passages are for so that if your re-build doesn't need certain detail you can omit those.
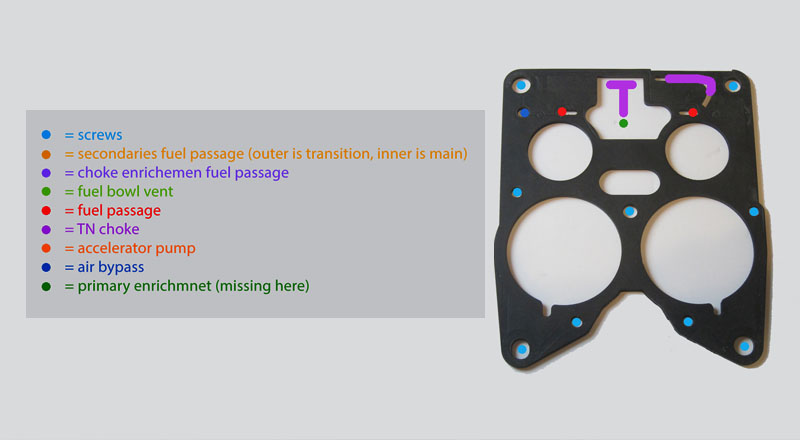
For example, see how those two gaskets below differ. I omitted a number of unnecessary passages for components that are not present on my carb version (there were numerous modifications over the years - read about it here) such as TN choke, TN choke enrichment, primary enrichment and stiffened some outlines that would make cutting the gasket that much more difficult:
Here is the bottom gasket:
If you are patient and careful, you will have quality gaskets that will seal the passages. All you need is some scissors, sharp scalpel, and a hole puncher with interchangeable bits. Cover the new gaskets with some lithium grease to prevent it from sticking to the matting surfaces then carefully tighten the screws. Be aware that by thickening the bottom gasket you will have to grind down slightly the locking cam that prevents secondaries from opening until the engine warms up.
Done! Please be aware that just replacing your gaskets might not fix your carburetor. You might need throttle plate re-bushed (read about it here), and there might be other sources of vacuum leaks. |
| copyright 2019 by Patryk Rebisz |