 |
|||
| Home |
|||
How to sound deaden your car
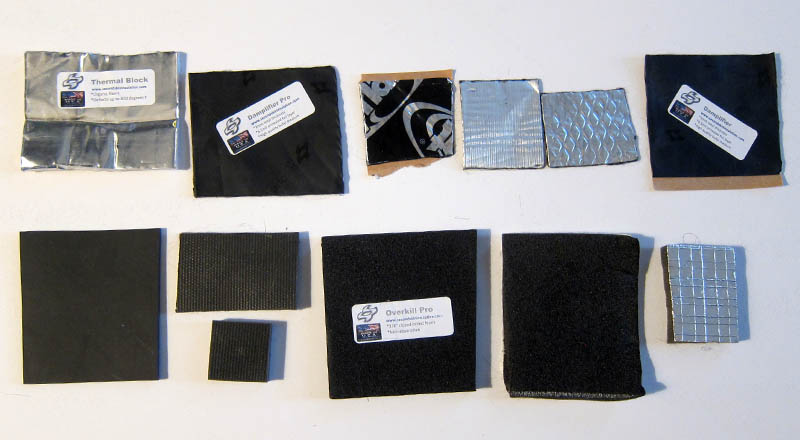
To better understand sound deadening it’s helpful to understand little bit about sound and frequencies. This might sound like a boring information, that I personally ran away from for as long as possible, but it’s vital in comprehending why certain materials and tricks are used. Sound is a vibration that travels through the air or another medium. Thus we’ll have to deal with 2 mediums: metal of our car and the air. Different solutions are used to solve those two problems. There are 3 products to sound deaden your car. (1) Your car is made up of many relatively thin sheets of metal that produce a lot of resonance. Those sheets of metal act like a drum producing lots of low frequency noise. The whole sheets starts vibrating and thus whole air around does as well. This is where all those butyl sheets such as Dynamat come into play. They introduce obstacles in the metal’s vibration. People tend to make a mistake by covering their whole car interiors with the butyl even though only around 50% coverage is necessary (cover half of a musician's drum with some material and see if it still produces any sound…). Extra covering beyond the 50% mark hurts your pocket without producing noticeable difference in the low frequencies as the 50% coverage does enough. (2) Second step is to produce a barrier between that deadened metal and your ear. This is done with a layer of thick rubber or vinyl. This mass-loaded vinyl needs to be somehow decoupled from the sound-producing metal, it's done a foam. Different manufacturers produce different product to solve this mixture or problems. Ad flammability and heat barrier ability and you will understand why there is no one-fits-all solution. Pretty much all manufacturers offer some kind of butyl to adhere to the metal sheets to deaden the metal’s resonance. When you add a few of those to your trunk, hood or any metal – you almost instantly will notice the difference – when you knock on the metal the hollow metallic noise is gone. That said the noise will still travel through metal and to deal with that you will need some foam and vinyl. Some manufacturers offer the foam by itself while others couple it with a thick rubber/vinyl. As always in life both have advantages and disadvantages. The main minus of the foam+rubber/vinyl combo is the extra price and the difficulty to work with the material that isn’t as playable as foam by itself. Advantage, of course, is that it produces superior sound deadening in one package. To summarize: And finally here are some options: Second Skin produces high quality butyl (Ultimate) with sticky glue. They also produce high quality foam (no glue backing) and high quality very playable vinyl.They also produce Luxury Liner Pro that is a composite of high quality foam with vinyl (because both materials are bonded it’s less easy to work with than foam and vinyl by itself) but saves you time as it doesn’t require double work of having to cut both foam and vinyl (and bonding those if you choose to). Another interesting material they offer is Heat Wave Pro that has very good heat absorption characteristics and excellent sound insulation. This material is made from chemically treated jute which might absorb moisture more than one would want (other than that the material would be my favorite insulator). Noico produce high quality butyl (80 Mil) with decent glue. They also produce what seems like (didn’t get to test it) quality foam with probably just OK self-adhesive. B-Quiet produces quality butyl with sticky glue (Ultimate; Extreme is thin and glue is weak). They also produce good quality foam (not as moisture proof as Dynamat or Second Skin) with OK glue but with aluminum backing thus dissipating heat better than the other two. They also produce their version of SS’s Luxury Liner Pro combining vinyl with their foam. Stinger produces high quality foam carpet with vinyl backing. The sound deadening quality is excellent but the material does smell so you will have to leave it out for a long time if you plan to install it in places other than your trunk. There are others but I didn’t get to test their materials. So, now that I've tested those materials what did I end up using on MY car? If money wasn’t the issues I would just use Dynamat Extreme as butyl to deaden metal and SS Luxury Liner Pro as one-stop sound insulation on most surfaces. Final observations:
Main operation of Solex 4a1 carburetor
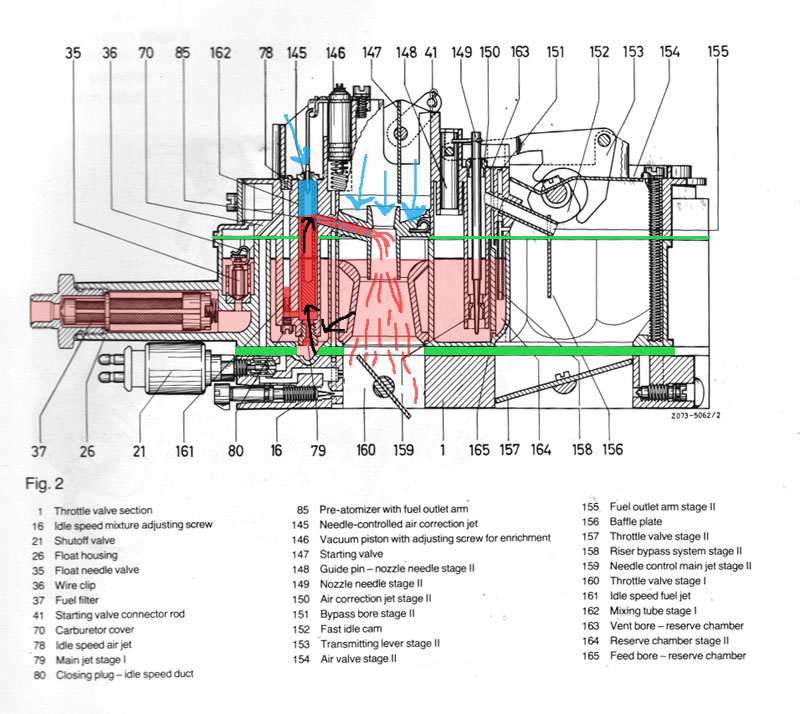
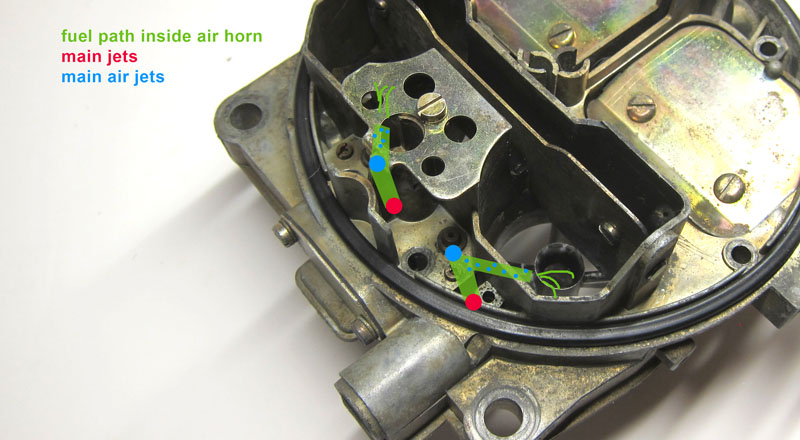
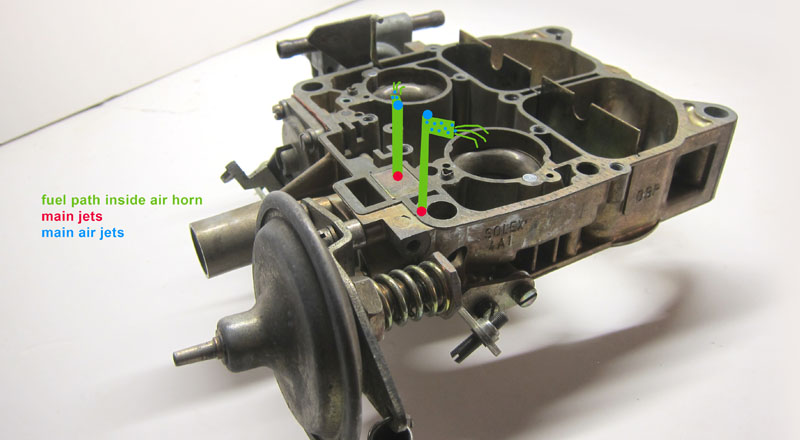
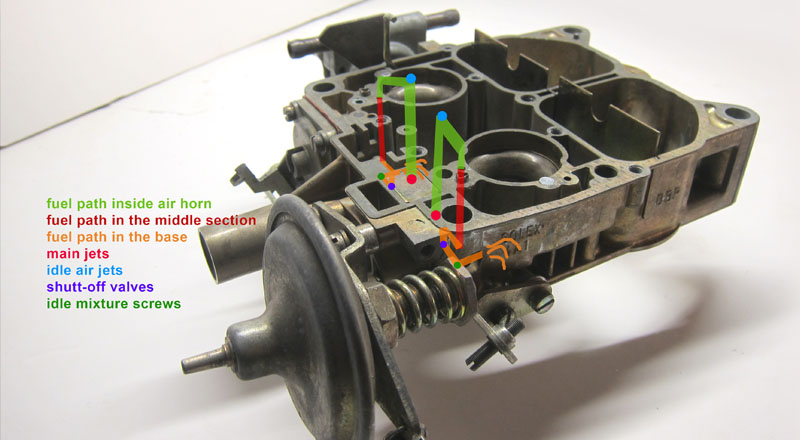
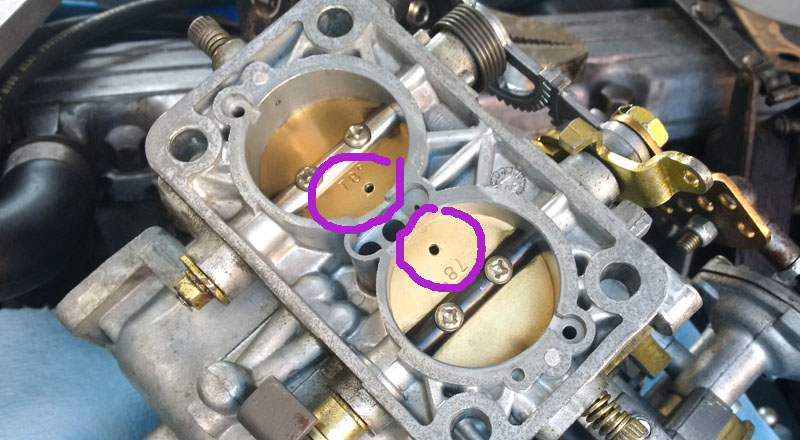
If you were to press on the gas pedal, the throttle plates open and the suction (vacuum) of the engine that pulled the fuel mixture though idle opening would disappear. There would be no suction anymore to pull the fuel through the idle passages but the suction force would start pulling fuel through other orifice. If you were to follow path of fuel at this stage, fuel is sucked in from fuel bowl through the main jet (79) at the bottom of the bowl and enters main mixing tube. In there it encounters preatomizer (85) that mixes fuel with air entering through main air correction jet (145). From this point the fuel is emulsified and is discharged into the carb's throat. Notice that here the fuel path is much simpler than at idle (the main mixing tubes are simply dipped into the bowl - they don't pass any gaskets) so any air leaks are much less obvious or destructive to driving experience.
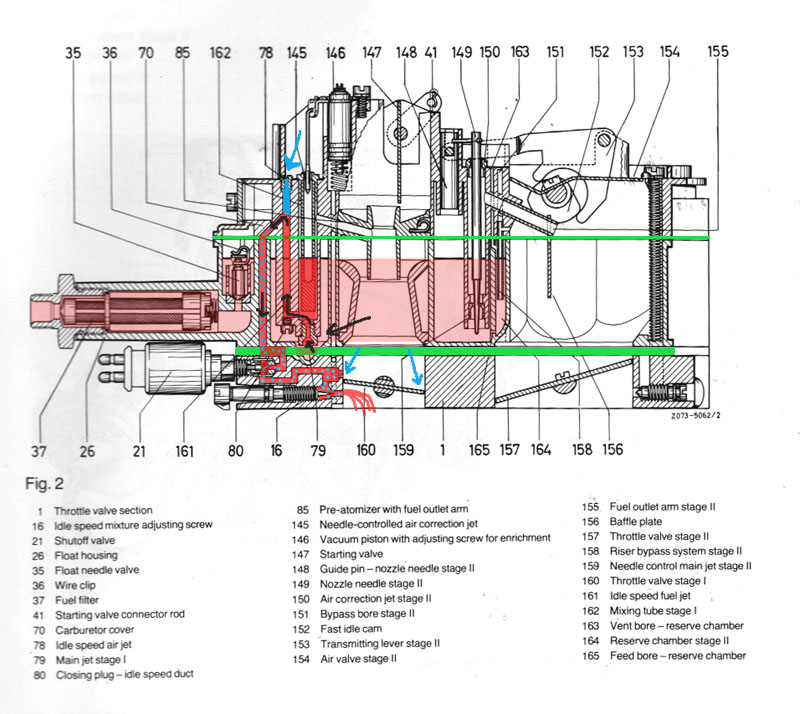
Idle operation of Solex 4a1 carburetor
The fuel enters the fuel bowl through a filter (37) and a float valve (35). At idle the throttle plates (160) are closed and very little air enters through the carb throats. The fuel (really, mixture of fuel and air bubbles) is sucked through tiny orifice below throttle plate into the engine. The amount of that fuel is controlled through the mixture screw (16) AND ease of that fuel being sucked in (fuel level in the bowl). If you were to follow the fuel's trek, the fuel is sucked through the main jet (79) at the bottom of the bowl then bypasses main mixing tube (162) entering idle mixing duck. In there, the fuel is mixed with air that enters through idle air jet (78). From this point the fuel is emulsified. It then travels through fuel shut off valve (21), past transition holes, idle mixture screw and into main intake throats. Notice the gaskets (in green) through which the fuel has to travel. If the carb is warped, it develops internal leaks where the fuel and air is exposed to other forces thud impeding its smooth travel.
Buying an old car
When I set out to purchase my first classic car - my de facto first car ever - I was terrified. Not only was it my first car ever, I also knew nothing about cars. I didn't understand mechanics nor what to look for when buying a classic car. The only thing I was certain of was that I wanted a classic. Below you will find some observations and what to look for when buying a classic. First, spend some time deciding what is it that you really want (and need). At first ALL vintage cars look great but soon you will find some visual patterns that you gravitate more towards. With time you find out that not all classic cars were created equal - some were better looking than others, while others had better finish and mechanics. The first thing to decided is find some ballpark cars that you gravitate towards. Second, ask yourself why it is that you want a vintage car. Are you looking for weekend hobby or do you want to fulfill your childhood dream of owning whatever you desired as a kid. There is a reason why convertibles and 2-door cars are so expensive - they are the most desirable because older guys simply want vintage car they loved in their youth cars as a weekend toy. If you are one of those, be prepared to spend money through the roof. For me it was a bit simpler, I needed a car with 4-doors because of my growing family. This was suppose to be our family car - even if used only every few days or so. This in some way limited my options as most vintage 4-door cars are not that desirable thus there is a smaller list of available prospects. BUT it also means that those 4-door undesirables tend to be cheaper than their 2-door counterparts. Why Mercedes for me? From my "About me" page: When I was a child growing up in Poland, my upstairs neighbor had a Mercedes (W123). I thought it looked fantastic and loved imitating the clanking noise of its diesel engine. Then one day I saw something even more exquisite, a w114/w115 Mercedes. I dreamed to own a car like that one day. The other contenders I would consider is early version Citroen DS, Jaguar E-type (not really a contender as it has only 2 doors and no rear seat) and a vintage 4-door Jaguar sedan. All three (really 2) were out of the question because they tend to show up for sale in the US infrequently. I did look at some of those amazing American road boats but the practicality of living in NYC with the narrow streets took over. Another visual consideration was to get a car that is uniquely vintage but also not so old-looking that it seems to be driven only every other weekend. This was suppose to be a semi-daily driver and thus was meant to look like one. While looking, set an imaginary budget. It's an abstract and really nonsensical number because you don't know what you are getting into yet... For me it was around $5,000 and I searched craigslist setting this as the upper search limit. This gave me better understanding of what's out there within my budget. Prices of vintage cars fluctuate greatly so one weeks search might be very different than another's, but it gives you a general cross-section of what's available. Back then I didn't know better so we went to see cars that looked good from a distance and only upon closer inspection looked like junk - this wasted us a lot of time but also made us that much more convinced that "this is the one" when we found our dream car. In essence, you want to find a car that was cared for. You can tell a lot from the pictures saving you time and energy. If the car was cleaned before taking pictures then at least you can hope that the car indeed was taken care of. Dash pad and seats wear will tell you how realistic the odometer figure really is (most vintage cars have only 5-digit odometer so you never know if the quoted 75,000 miles is really 175,000 or even 275,000). The interior condition will tell you the real story. When you look at the interior pics see if you can spot the rubber elements to judged how far they have deteriorated. 30-40-50 year old rubber will need to be replaced but at least you want to make sure it will not be an immediate concern. Looking at the seats will also let you know if the seats were re-upholstered recently. If so - great plus because that will save you thousands of $ as old foam or whatever padding material they've used will be disintegrating by now no matter how well the car was babied. Photos of the engine bay are vital as they show if a.) the seller cares enough about mechanics to include the picture (thus might be knowledgeable about some DIY jobs that he probably had to perform recently one way or another); b.) it shows you general condition of the engine - one again, the cleaner it looks the more hope you have that the engine was properly maintained. Yes, this could be only a perception but at least it's a starting point. Look especially at the rubber elements as most likely they will have to be replaced if they weren't by the previous owner. The more new components you see - the better because the elements break no matter how well maintained they might have been through the decades. Here a little note about leaks - they are not necessarily bad: some oil loss is OK and the engine not cleaned for a long time might appear worse than it really is. In essence you want to see signs of care. An old car doesn't have to be perfect - it shouldn't be - it's too old, but it also doesn't have to look like a used up prostitute. Some flows are normal and acceptable but major flows should be red flags that the car simply didn't get much love in the past. See if you can find enough redeeming qualities and be on a look out for obvious disregard for maintenance or care.
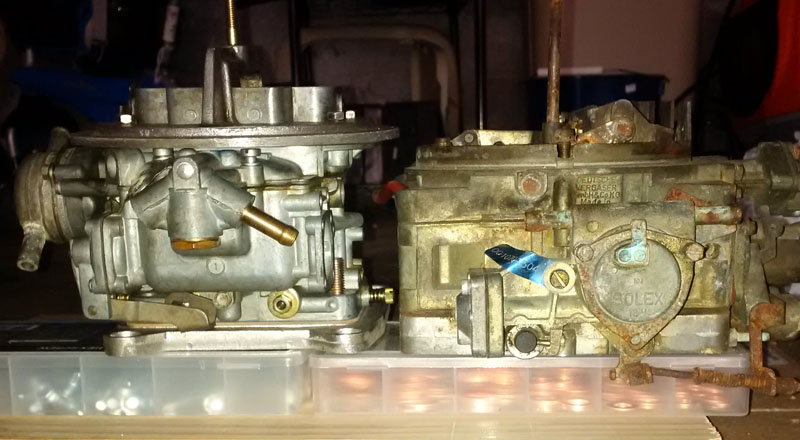
Difference between Solex 4a1 and Weber 38 carburetor
Weber carburetor is a popular replacement for malfunctioning Solex carbs. The carb has a great racing pedigree and because it’s endlessly customizable it is a decent substitute, but… Yes, here is the but. Before deciding on the swap understand that Solex IS a better match for your car for many reasons I’ll outline below. Those two are different carbs that also have different characteristics. By replacing your Solex you are trading some pros (and cones) for a different sort of pros and cons. Physically Weber is a 2-barrel carb while Solex has 4. Solex "saves" you money on gas by operating on its small primary barrels only kicking in the secondaries when the engine needs it. Solex is about 3/4 inch shorter so the closed hood doesn’t rest on the air filter. Moreover Solex has throttle lift dashpot that stabilizes your idle when the engine needs more power running AC for example. Now your Solex might have been molested over years by many untrained “mechanics” and it might have developed warpage that might be hard to fix, so spending a few hundred dollars for a brand new Weber carb might be enticing but understand that the conversion from Solex to Weber is NOT bolt-on simple. You WILL have to modify some aspects of the plate, linkage and the carb... So maybe it's better to just rejuvenate the old Solex? So what are the problmes with the swap? Straight from the box Weber will NOT idle on M110 engine because the engine needs a bit more air to breath. On Solex you have air bypass screws (the untouchable screws at the base of the secondaries) while Weber does not. You try to get the carb to idle just enough so you can set the mixture screws but it doesn't let you without screwing in the speed screw - thus upsetting your adjustments. The solution is to drill holes in the throttle plates of the Weber carb (on mine they are 2.3mm in diameter) as a sort of simple air bypass that’s found on some other carbs - and you thought it was going to be simple...
This action let you idle at a decent enough RPM that you can close the throttle plates so that transition holes are not exposed (VERY important) to set the idle properly. When the car idles OK with the transition holes not exposed and holes in throttle plates, you can start tuning. Most likely you will have to bump up the idle jets to 65 or even 70. They are easy to get to – you just unscrew side screws on side of the carb. This should up your idle to around 850-900 RPM in P. The problem is that we don’t idle that often in P rather in D, so it’s important to check the RPM in D. On mine, when switching from P to D, the RPM drops by around 300. So from acceptable 850 it goes down to 550, which on M110 engine is simply too low. The solution is to open up speed screw (thus exposing transition holes – which is kinda OK because by now you have set your mixture screw properly BUT getting sluggish acceleration as transitions holes are not really doing their jobs anymore). Weber has a nipple for fuel bowl vent but the instructions that come from Redline don't specify what to do with it. Well, if you have the plumbing, connect it where your Solex was venting, if not, then just cap the nipple. Solex has an easy way to control the choke pull off with a screw. On Weber, the screw is capped so if you are unhappy with the choke pull off - you need to uncap it. If you need to remove air horn, this operation is much easier on Solex because the choke is held with a spring wire while on Weber you are dealing with a tiny c-clip. Removal of air horn gives you access to fuel bowl - again on Solex you can right away see the fuel level while on Weber you must guess because to set the fuel level you need to set the air horn at 90 degrees as the float is attached to it. Adjustment of accelerator pump is much easier on Solex with simple screw. But what does complicates Solex are its secondaries and need to set the air flap tension by ear of the engine as you drive it (there is a weight recommended in the manual but it's pretty much useless in real application). The above is just a short summary but I hope it shows you that a "simple" solution of just getting a new Weber is not as straight forward as putting down the money to buy something really is. The fact that vast majority of mechanics aren't experienced in carburetors anymore leaves you stranded with seeking your own answers but unfortunately the internet is littered with he-said-she-said garbage and it's actually very hard to find solutions.
Solex 4a1 carb - what can go wrong?
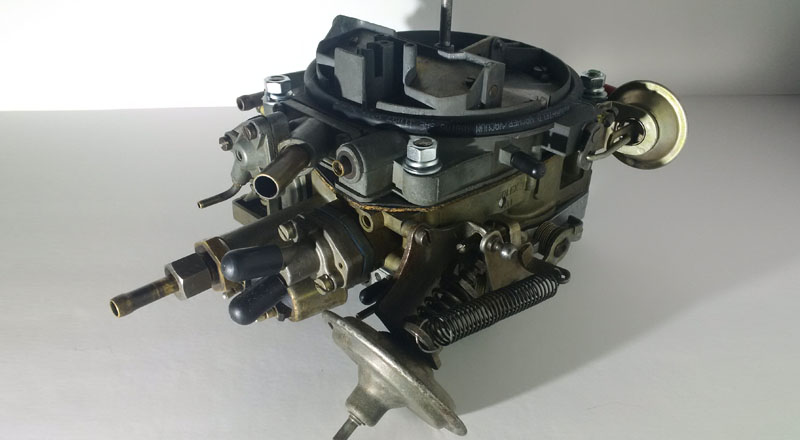
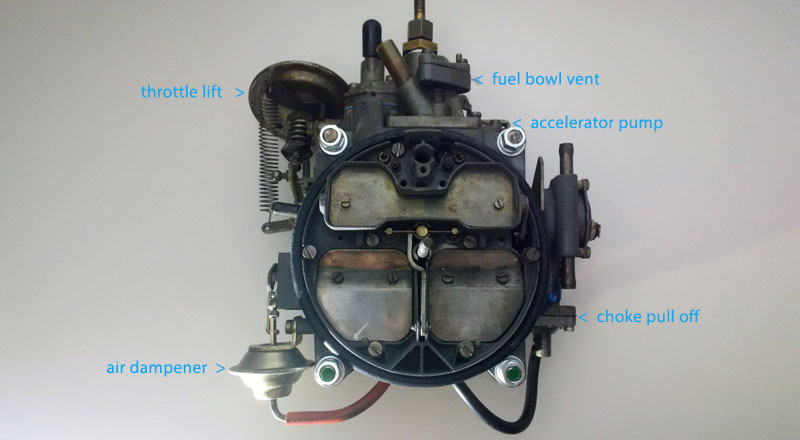
Solex 4a1 is a 4 barrel carburetor. The two smaller barrels feed the engine through most of the driving range, the larger barrels give the engine extra boost when needed. The carb has gotten a bad rap partially deserved and partially due to people's inexperience setting it. The main complain is the warpage of the air horn (top part of the carb that holds the choke and the air flaps for the secondaries). The metal this part is made from is soft and prone to over-tightening. When it warps it can impede smooth opening of the choke or the secondaries air flap. If your carb is warped - there is hope, but if the shafts bind, the repair is way too complex for an average user. When the carb warps, it develops vacuum leaks that can't be easily found by the traditional method of spraying carb cleaner (or other flammable substance) around the gasket edges. Simple and INEFFECTIVE method to fix this condition is to tighten all the screws in effect warping the carb even more. The vacuum leaks are internal exaggerated by the complex layout of the channels feeding the idle circuit forcing the fuel/air mixture to pass through no less than 2 gaskets. The only solution here is to open the carb and use a thicker gasket - that you will have to manufacture as the one in rebuild kit comes with standard thin gasket - in hopes that compressing the thicker gasket material will seal the air leaks. The carb relays on 4 or 5 (depending on model) rubber diaphragms that if leaking due to age can impact its workings. The accelerator pump, air dampener, throttle lift, choke pull off and fuel bowl vent (this sometimes is sealed off in early models and in later an electric switch is introduced instead). Accelerator pump and choke pull off diaphragms come in the rebuilt kits but the other two (or 3) don't. Leak in throttle lift will force you to disable its useful feature of lifting the throttle when vacuum drops due to engine's work (when you turn on AC or when you abruptly close the throttle). Leak in the air dampener will screw up workings of the vacuum controlled secondaries forcing you to permanently disable those killing your drivabilty when the engine's power is needed. You can check those diaphragms by connecting a vacuum pump to each nozzle to see if the part holds vacuum.
Assuming that the gaskets are sealing and the diaphrams are holding vacuum, you now have to deal with setting the carbs as over the years the carb "experts" have probably touched every screw that can be touched. The screws at the bottom of larger vacuum secondaries are meant to be set at the factory with specialty equipment - too bad for the casual user. If the screws were messed with (as they most certainly have) - start with 1/4 screw out. TN choke screws also were meant to be set at the factory and personally I block off the TN choke relaying on traditional choke and fast idle screw. The idle screws should be around 1-7/8 or 2 screws out. Choke pull off vacuum nipple should pull the choke open by 1.5 to 3mm (depending on the version) - this can be regulated by the crew in the choke vacuum housing. The screw holding the spring tension of the air valve of the secondaries should hold the air flap closed. This is hard to get right. The manual calls for a home-build weight of very specific mass but in my experience it doesn't serve well setting the spring tension. You simply must drive with your air cleaner off and preferable RPM installed and listen to when it kicks in. The air flap should open at around 3000 + RPM while pulling hard.
Any carburetor - how to set-up choke
When engine sat overnight, it's naturally cold. When air/fuel mixture is sucked through the intake manifold on start-up, significant portion of the mixture condensates on the walls rather then being pulled into the cylinders. As the engine warms up, metal expands. On cold engine, before the metal has expanded, there are "gaps" between cylinder walls and the pistons thus the vacuum on cold start-up is much lower then when the engine warms up and the tolerances get tighter. So cold engine has two factors going against it - cold walls condensate much of the air/fuel mixture making it less susceptible to combustion AND the lesser vacuum pulls less of that air/fuel mixture into the engine due to lesser tolerances. This is why on cold engines we need richer mixture and to get that richer mixture on carbureted engines we need a choke. On cold engine you press the gas pedal BEFORE turning the key. When you let go of the pedal, the carb's choke is set. A few things happen at the time: the choke flaps close COMPLETELY and the fast idle screw rests against the cam that holds the throttle plates more open then at normal idle. When you turn the engine on, the vacuum generated by the engine pulls the choke plates open SLIGHTLY (1-4mm depending on the engine and carburetor). The engine is choked preventing too much air getting into the engine AND keeping the vacuum under the choke plates high thus pulling in way more gasoline than at normal idle. The mixture is very rich at this stage. As the engine warms up, the spring in the choke housing warms up too gradually opening up the choke plate (thus decreasing the vacuum = less fuel is pulled in AND letting in more air into the engine). As the engine warms up and the choke opens, the mixture gets progressively leaner but at the same time the RPM increases as the increased engine temperature lets the leaner mixtures atomize better. If you were to note your RPM on cold start up and then without touching the engine let the engine warm up, the RPM would increase drastically. If you were to tap the gas at any time the RPM would drop as the choke's spring that held the throttle plates open via the fast idle cam would let go and the fast idle cam would disengage closing the throttle plates. At the same time if the choke spring is still on on the coldish side, the fast idle would still stay relatively high. This is to prevent idle RPM drooping too low when coming to a stop after a short drive (when engine is still coldish). If after a short drive your RPM drops too low at idle, this means that the car's choke has opened up fully even though the engine is still not operating at its optimal temperature and the fast idle cam got disengaged closing the throttle plates to regular idle position. This means you should let the choke on for a bit longer by turning it to its RICHER setting.
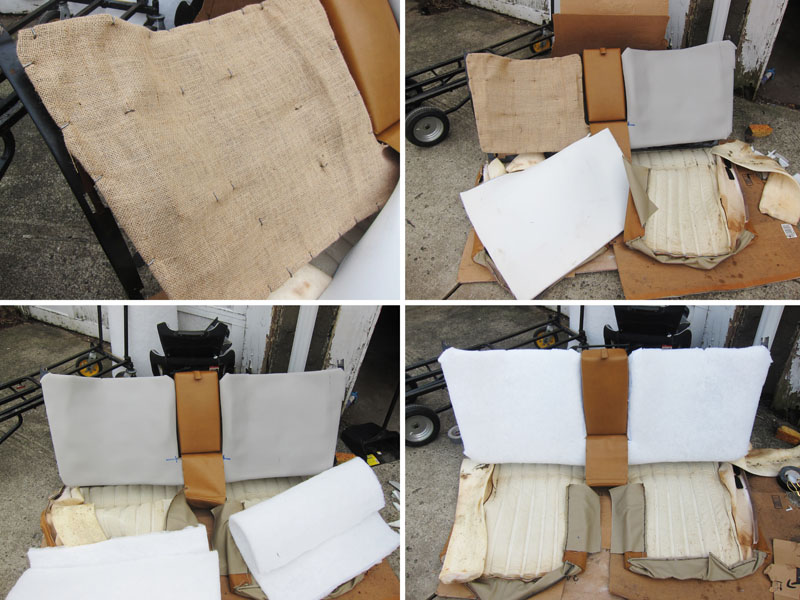
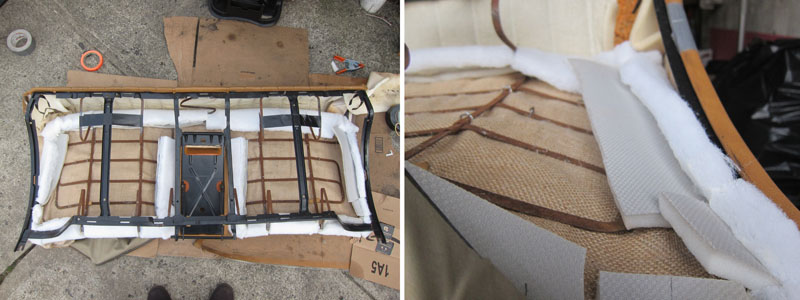
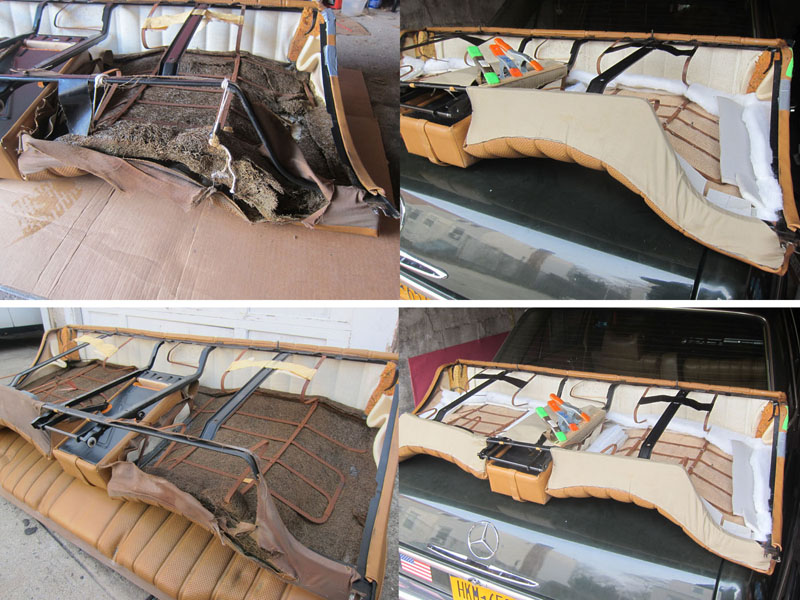
Rear seats re-padding on w114/w115 The rear seats are re-padded in my 1973 w114 280! For those interested - get burlap, dacron, 1/2 foam, hog rings (and pliers) and some heavy-duty spray adhesive. Attach the burlap with some hog rings then use spray adhesive to attach foam to the burlap creating the seat shape. Then finish for softness with dacron (also attached with spray adhesive).
The process is bigger bitch than I anticipated because the "brilliant" Germans decided to use glue to secure top of the vinyl and the arm rest so I had to work around it with the foam.
Hunting for fuel economy with old cars
I have 1973 280 with a Weber carb and was getting super low fuel economy. It started at 7mpg then I managed to tune the carb so I was getting 11, then after park break adjustment I'm at whooping 14! Here are some factors that influence your fuel consumption (in no particular order): -- (carb) wrong fuel bowl venting method
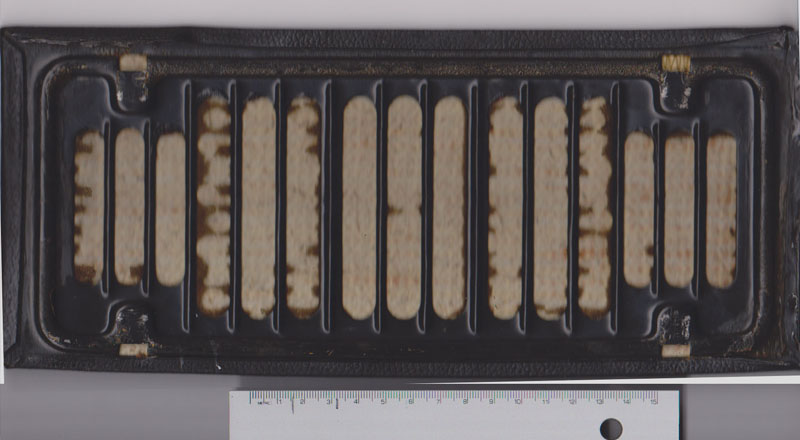
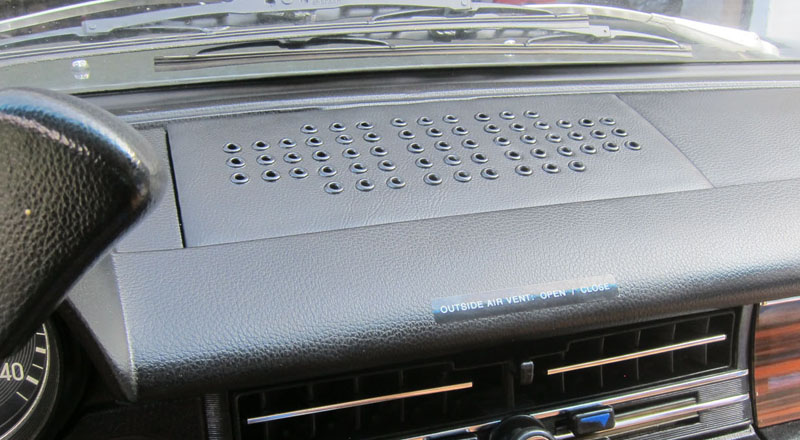
Rebuilding speaker cover on w114 The interior of my 1973 w114 280 looked pristine... except the gash in the speaker cover.
I grabbed 1 yard of black vinyl from this place ( https://www.perfectfit.com/product.aspx?d_id=15989&p_id=167820 ), traced the opening in the metal that's hiding under the vinyl/plastic original cover to know where to punch the holes, punched the holes, added black grommets and reupholstered using a thin black felth to put some space between metal grommets and the metal cover. Use E6000 glue as it's stronger then contact cement to wrap the vinyl around the edges.
Here is the result:
|
|||
|

| copyright 2019 by Patryk Rebisz |