How to tune Weber 38 carburetor (as replacemen of your Solex 4a1)
by Patryk Rebisz

So you've decided to toss in the towel and install Weber 38 carburetor instead of Solex 4a1 on your engine. Good or bad decision - hard to say. That said, you probably will have some trouble tuning it as the installation instructions from Redline (the official Weber distributor in the US) are lacking. Here are some helpful pointers.
1. Idle stumble can mean that your mixture is too LEAN or too RICH. The engine doesn't like too little fuel or too much. Best way to tell is to pull a few spark plugs (1 from front and 1 from back). If the ceramic tip is brown - you are ok, if it's white - you are too LEAN, if they are black - you are too RICH.
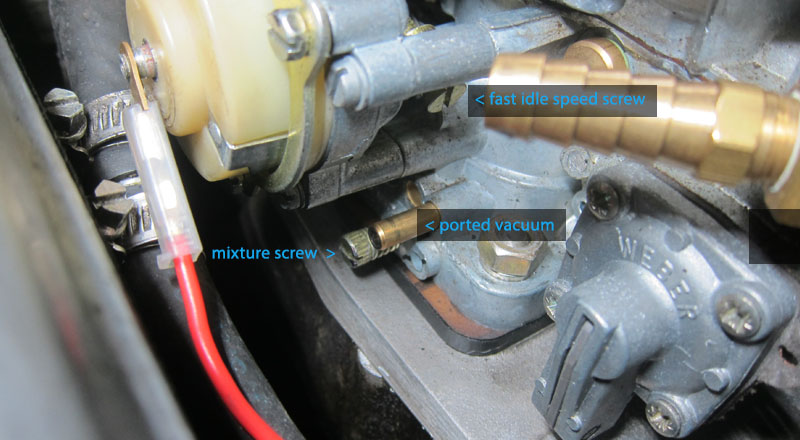
2. Get yourself a vacuum gauge (they are dirt cheap) and see where you stand with vacuum. There are 2 nipples on the carb: 1 for ported vac (on the side close to the engine) and 1 for manifold vac (the curved nipple near the accelerator linkage). Connect to manifold vacuum and see the pressure. The vac gauge will come in handy later while tuning the carb.
3. Get yourself a timing light with tach meter (again, they are cheap) and see where you stand with timing. Make sure you DISCONNECT vac advance as on your car (M110 engine, right?) it's a retard so at idle it retards the timing, thus produces less vacuum, thus less mixture gets sucked into the engine. Sounds familiar? When vac advance is disconnected you should time you engine at 8-12 BTDC (manual calls for 7 BTDC static). See where your MECHANICAL advance takes you (on mine the springs were very stiff and I would always get way less advance than I should). The more advance (within the specs) the better.
4. Fuel pressure. All Weber literature asks for fuel pressure of no more than 3.5psi. Your MECHANICAL pump probably outputs around 5 so you will need fuel pressure regulator set to around 3psi. Some will also mention fuel return but a knowledgeable Weber expert said not to worry about return.
5. You should also check valve clearance as all those (timing, valve clearance, mixture) co-interact but if it's too overwhelming just temporarily move on to tuning. Just be aware that when you finally do your valves you will have to re-tune the car.
A list like the above scares the crap out of any novice mechanics (it did scared me when I started) and they mistakenly move to tuning assuming all the other elements somehow will fall in place. Since you are dealing with a very old car - no matter how well taken care of - it will have out of specs issues here and there so it's always good to confirm that all the elements are within specs.
TUNING:
You have 4 screws on your carb: 2 mixture screws (at the bottom of the base), speed screw (near the linkage) and fast idle screw (hidden near the choke).
MIXTURE screw controls how much fuel is allowed to be sucked into the engine at idle(turn right = less; turn left = more fuel). Remember the engine cares about "perfect" amount of fuel NOT more. More isn't better!
SPEED screw controls the RPM of the engine when idling (when engine is warm). Screwing in this screw you open the throttle plate exposing the transition holes (secondary holes above the mixture screw holes). Ideally when tuning the transition holes are totally covered (you can confirm it by connecting your vac gauge to ported vacuum nipple on the engine side of the carb - it should read close to zero). Covering transition holes will drastically reduce your RPM during tuning but it will also remove the variables as you are dealing only with the MIXTURE screw hole.
FAST idle screw deals with cold start and choke - another lengthy write up, so lets not do it here yet.

So...
Warm up the engine and remove air cleaner for easier access (final adjustments MUST be done with air cleaner on - carb adjusting screwdriver is a must to adjust the screw close to the engine = expensive!). This will also let you confirm that your choke - the metal plate near the carb's top entrance - is fully open as it should be open with warm engine operating at regular temperatures.
You screw both MIXTURE screws in all the way until you touch the bottom (don't over do it) and back it out 2 full turns.
You screw out SPEED screw until it doesn't touch the cam anymore and screw it in by 1/2 turns (I like having my vac gauge connected to ported vac to confirm that I don't get any vacuum from that nipple = transition holes are not exposed). Speed screw is best set with carb inverted so you can confirm that the transition holes are not exposed.
Start the engine, it will sound like crap.
Start screwing in the MIXTURE screws by 1/4 turns (on both sides - as each screw feeds only 3 out of 6 cylinders - remember that perfect mixture on one side doesn't make the engine sound good if the other side is out of balance). You can later fine tune it by using 1/8 turns. Basic idea is to get the best sounding / most vacuum producing engine.
Many will tell you to use vac gauge and tune for highest vacuum but in my experience the vac difference is so small that you truly have to be an expert to perceive it. Use you ear.
When you find the best MIXTURE screw setting back out the mixture screw slightly to make sure your mixture is slightly on richer side then move on to SPEED screw.
Turn in the SPEED screw and set you idle at around 850 RPM (using your timing light with tach meter). I'm certain that it will involve exposing the transition holes more than one should which means that you might need to re-jet your carb - which is a journey of its own or to drill small holes in the throttle plate to let the engine breat more air.
Drive around and confirm by pulling the sparks that you are not too rich or too lean.

How to set carburetor choke
by Patryk Rebisz

Choke is restricting air intake when the engine is cold with the choke plates on top of the carb. By restricting air flow it lets engine's vacuume get to the fuel passages pulling the fuesl from all oprfices that normally only feed the fuel at higher RPMs. At start up the mixture is very RICH mixture (lots of gas and very little air) as the cold engine has harder time igniting the mixture. As the engine warms up, the choke opens up slowly letting more and more air thus making the mixture a bit less rich until finally when it finally opens you have proper mixture (not too RICH and not too LEAN).
It's important to press the gas pedal ONCE on cold engine that sat through the night (or on cold days for more than 1 hour). When you do so, the choke engages. When you turn the key and the car doesn't start right away, do NOT press gas pedal second time to give it more gas (or whatever the reasoning is)! This will release the choke thus make the start even more difficult. On cold days it can take 10 plus seconds to start the engine so just keep it cranking. If after a few second sof cranking the engine is still not engaged, turn the key to the off position and press the gas again setting the choke one more time.
When the engine is finally turning, assuming you are still parked, you will hear it stumbles then slowly picks up RPM until it revs higher than your regular idle. If at that time you tap the gas pedal it will release the choke partially and your idle RPM should drastically decrease (if you do it too soon and keep the car parked you might hear the engine stumbling because it's not warm enough).
If you were to look at what happens with the choke you would see:
1. press the gas pedal before starting the car = choke closes completely.
2. engine starts and the vacuum pulls the choke cover slightly (around 1-4 mm depending on your car and carb type)
3. as the engine operates the choke cover opens slowly letting in more and more air
4. if you do not touch the gas pedal the engine will rev up much higher than your regular idle because the FAST idle screw is holding the cam level that controls how much the throttle plate is open. For cold start, the throttle plate is made to be open way more than for regular idle thus the engine is sucking it a ton more gas than at regular idle. If you want to keep on idling at regular speed simply press the gas pedal and it will release the hold bringing your RPM to regular (don't do it when the engine is too cold or it might stumble).
5. if you were to floor the gas when the choke still hasn't fully opened you can get blow back from the carb so for the first few minutes of driving be a bit gentle with your gas pedal.
The only two real adjustments is FAST idle screw (how much the throttle plate is open when cold - thus how much has the engien can suck in) and the choke (the speed with which it opens the choke plate).
The choke has 3 screws holding it down to carb body. If you need to adjust the speed with which the choke plates open just unscrew the screws and move the choke left or right. To be honest you have to try it to fully adjust it and because each time you do so you need to do it on a cold stone engine it might take you a few tries to get your "perfect" choke.
Re-padding front seats on w114
by Patryk Rebisz
The factory padding is made out of ruberised coconut fiber that after 40+ years turns to dust every time you sit down. If your vinyl is in good shape you can re-pad your seats using foam. The basic principle is to use hog rings to attach burlap to the frame/springs. Then use industrial strenght adhesevie such as 3M Hi-Strength 90 Spray Adhesive to attach foam to the burlap then more adhesive to attach soft dacron to the foam. For those who look to re-pad their seats on their own here are a few tips.
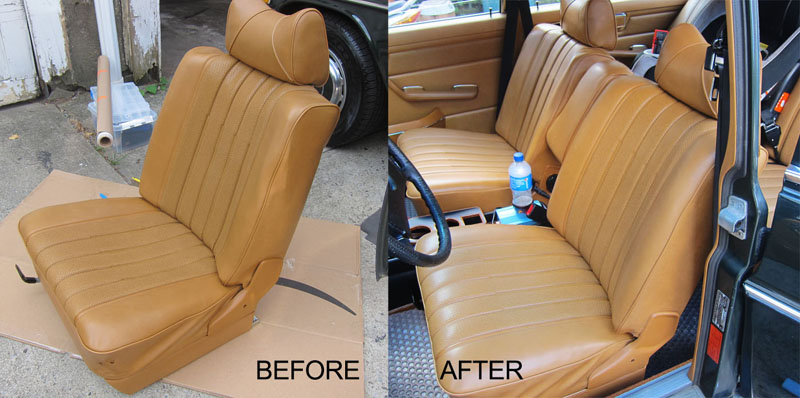
First, here is before and after pic. Optically I prefer the more squarish shape of the "before" seat but the comfort of the "after" seat is incomparable. To top it of, now I ride around 1 inch higher thus making me feel more in command of the car (notice that the passenger seat in the "after" pic hasn't been done yet):
As always I've ran into issues that took way longer than necessary to resolve.
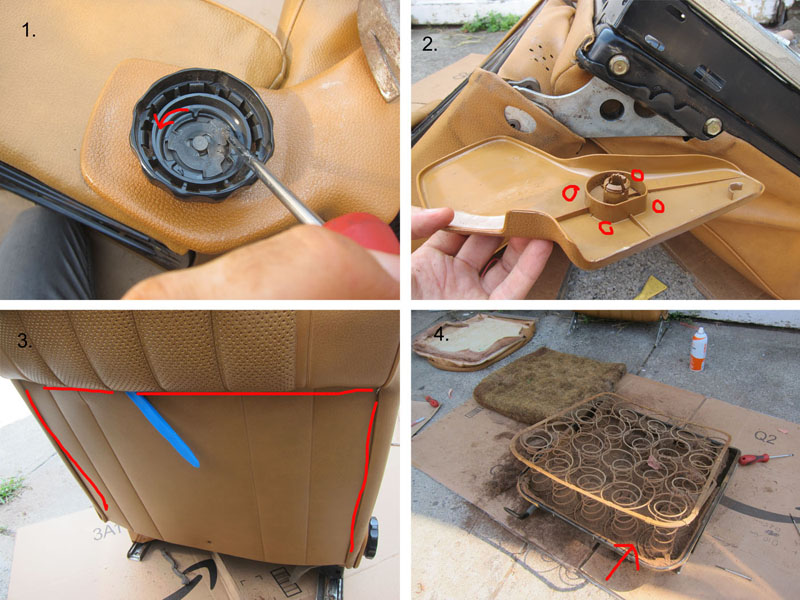
1. After you pop out the plastic cover of the seat reclining knob you have to rotate the plastic knob against the retaining metal washer to release it (it took me forever trying to pray the metal washer out before I discovered it...).
2. The plastic cover is held into the hole via a black plastic retainer. The two interlock so there is no other way to remove it than to press gently yet firmly on the red dots (as close to where the plastic mounts so as not to break the plastic) lifting the cover.
3. The vinyl was often "stuck" to the insides of the metal frame so it look lots of lubrication and plastic praying tool work to let it loose so that I could remove it from its grove.
4. At the bottom of the springs there is a thick felt padding that due to age and collection of "horse hair" dust is absolutely filthy - so when you re-pad your seats don't forget to find some material to replace it as it usually doesn't come in re-pad kits..
When your vinyl cover is off it's good time to fix any rips with extra vinyl and some contact cement or E6000 glue. You can also use HH-66 Vinyl Cement to glue plastic vinys side to other vinyl. This adhesive melts the material slightly creating a very permanent bond.
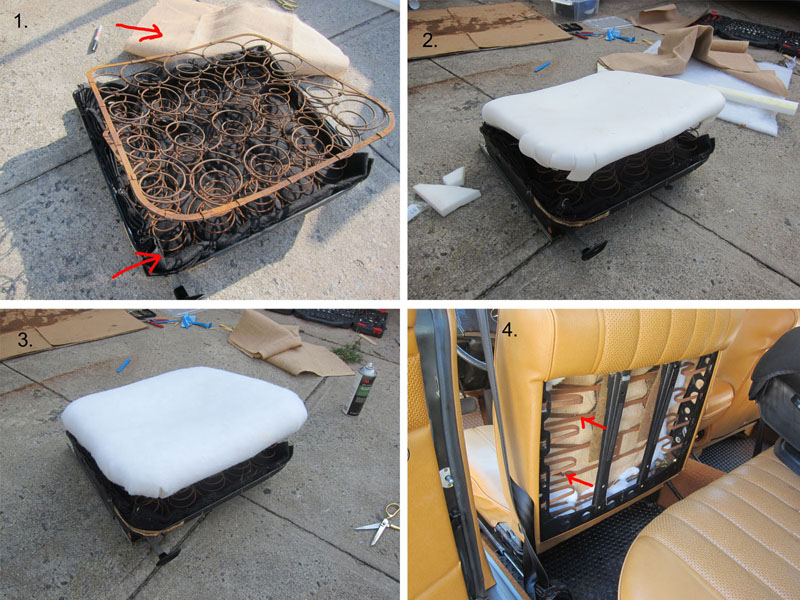
And here is how you re-pad it. You need some burlap, some foam, some batting, some hog rings, some felt (for no. 4 from above).
1. Replace bottom springs padding.
2. Attach the burlap to the springs with hog rings (use pic 4 as reference - arrows point to some hog rings). When the burlap is secured against the shape of the springs, cover it with contact cement spray. Attach foam to the burlap starting in the center (so the foam takes on the contour of the seat).
3. Spray the adhesive on top of the foam to attach the batting.
If you compress the springs with your body weight you should have no problems pulling the vinyl over the foam. The foam/batting combo is very pliable so you should spend some time straightening seams and overall making sure your seat looks as awesome as possible before putting the seat together.
Hope it helps. Be warned, this job takes WAY loner that it seems at first! |